Creating a Remote Scope
You can create a remote scope before or after initializing a Bit workspace.
Quick Guide#
For those that don't like reading docs feel free to follow the quick guide at the top of each page.
- Create an account on Bit.dev and login
bit login- Create a new scope on Bit.dev
- Update your default scope in the
workspace.jsoncfile with the name of your scope
What is a Scope?#
Scope is a virtual storage for components. Bit uses Scopes to save versions of Bit Components and access them as needed. Set Remote scopes on Bit.dev or self-hosted Bit servers to share components.
Create a Bit.dev account#
By default, Bit is connected to bit.dev as its default hosting provider. Run the bit login command for Bit to open a login/sign-up form for a new personal account.
bit loginOnce an account has been created successfully, your terminal will greet you with the following message:
successfully added @bit as a scoped registry at /Users/<account>/.npmrcsuccess! logged in as <account name>tip
Use bit login --help or bit login -h to get a list of available options for this command.
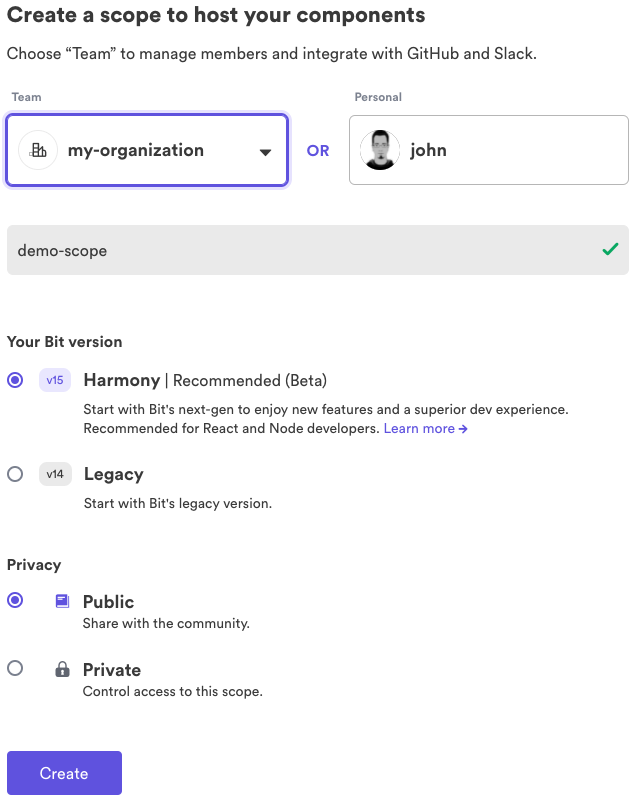
Create a Remote Scope#
Open the create scope tab:
- Choose your account name.
- Type
demo-scopeas the scope name. - Select Harmony as "scope type".
- Click on "Create".
Now in our node modules we can see we have these components under the correct scope.
Updating the Default Scope#
Once you have setup a remote scope you may need to configure the workspace.jsonc to reflect the correct username and scope.
- Open the
workspace.jsoncfile - find the line
"defaultScope": "my-scope" - Replace it with your username/organization name, and 'demo-scope' as your scope
{ "teambit.workspace/workspace": { "defaultScope": "your-username.demo-scope" }}Linking your Node Modules#
As we have changed the default scope we now need to make sure our node modules are linked correctly. We can do that with the bit link command.
bit linkResetting the Dev Server#
Any change in the workspace.jsonc file requires a restart of the local dev-server. We can stop our server using (Ctl/cmd + c) and run it again using the start command.
bit starttip
Use bit start --help or bit start -h to get a list of available options for this command.
What's Next?#
Once you have created your remote scope and configured your defaultScope you can then create more components, compose components or export your components to the remote scope so they can be published and installed in other Bit workspaces or in other web projects.